You have your MDT task sequence perfected! All of your machines are configured in the MDT database. When you boot a machine into MDT, it looks up its name and images without any prompts. If only you didn’t have to physically PXE boot the computer! If only you had a way to remotely PXE boot a computer…

Rethinking a PXE Boot
Your goal isn’t to PXE boot a computer; your goal is to set the onboard-NIC as the primary boot device. That small difference is so important! When a machine is online, changing the boot order this way will allow it to boot into a MDT task sequence the next time it starts up. This post will focus on remotely PXE booting a Dell computer. This same concept can be applied to any make/model that allows you to edit the boot order.
Your first step is to build a BIOS settings package that sets the onboard-NIC as the primary boot device. If you haven’t made a BIOS package yet, this guide covers the steps in detail. Download and install the Dell Client Configuration Toolkit. The download can be found here.
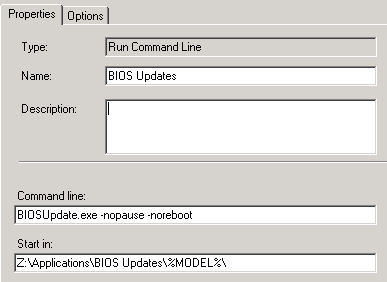
Launch the Client Configuration Toolkit, select Create Package, and choose Multi-Platform file. In the boot management section, double click on bootorder. Select View/Change – Edit – Add Device. Your first device should be the embedded NIC with a Device Instance of 0. The second device should be the Hard Disk with a Device Instance of 1.

Save the boot order and export the configuration as an EXE. If your machines contain a BIOS password, specify it now. Copy this EXE to a network share.
Running a Batch File Remotely
Now we need to create a batch file to execute this package on remote machines. We will be using the PSTools suite. A download can be found under the Desktop Management section here.
Copy the psexec and psshutdown tools to the root pf your local profile. Create a new batch file in the same folder. Paste in the following:
xcopy "\\SERVER\SHARE\Dell\forcepxe.exe" "\\%1\\C$\Users\Public\"
psexec \\%1 -u DOMAIN\USERNAME-p PASSWORD -h "C:\Users\Public\forcepxe.exe"

psshutdown.exe -r -t 60-c -m "This computer has been scheduled for a remote image. If you would like to delay this process, please select cancel" \\%1

pause
You will need to edit the xcopy path to point to your BIOS settings EXE. You will also need to specify credentials for the psexec line. The user specified needs to be an admin on the remote machine. You can now run this script from the run box. I named my batch file forcepxe.bat. By pressing WIN + R, I can simply type forcepxe REMOTECOMPUTERNAME to run this script.

Remotely PXE Network Boot a Computer
In the script output, you should see that the BIOS package successfully copied and executed on the remote machine. The machine will pause for 60 seconds to allow a user to cancel the reboot. After a minute, it will restart and boot off of the NIC! Pretty awesome right? One problem though – we are now stuck in an endless loop. The machine will install the OS and reboot back into a MDT task sequence. On the bright side, you don’t need deepfreeze anymore. 🙂
In our next post, we will edit our task sequence to prevent this endless loop by changing the boot sequence in Windows PE. Do you have another way of PXE booting a remote machine? What hurdles prevent you from getting to a Zero Touch image?